By the Wednesday two days after my birthday, I was agitated and disturbed that I still hadn't gotten any cake. Perhaps this is an obsession born of my love of cake--when else can one demand cake with impunity?--but there is a stubborn part of my subconscious that insists birthday=cake. Therefore, to put the inverse mathematically, birthday minus cake=no birthday. Or no celebration, for sure. So that afternoon, I took matters into my own hands, which is obviously another story....
because on Friday morning, my oh-so-thoughtful friend Jenny took matters into her own hands and brought over a delectable chocolate cheesecake-topped cake and this scrumptious tart (pictured partially eaten)! As she suspected, I had in fact tried a similar tart the week before at Cafe Selmarie. That was not an issue; more importantly, this tart meets my eating/buying out rule of "I don't order or buy foods I could realistically make myself". Thanks for knowing my rule and following it, Jen!
27 August 2006
26 July 2006
Lazy Pear Pie Gets Fancy
Two weeks ago as I was getting psyched for
a trip to Ravinia with some friends, I started to think about what I should contribute to our picnic. As I was sorting--no, not sorting, make that "looking through" and thinking about sorting--some recipes a few days earlier, I had seen one called "Heirloom Pear Hand Pie". Though chocolate is de rigueur for an all-girls outing, I've been trying to avoid dairy lately. Therefore, the pear pie seemed like a possibly acceptable substitute. And the "hand" part; how perfect for al fresco dining, right?
Well. As Friday afternoon drew nigh, I still hadn't found the recipe or made the pie, and when I finally did start looking for it, it was nowhere, though I really did see it a couple days before. I did. Without it, I'd have to change my plan. But I didn't want to change it drastically or I'd have to run to the market for ingredients.
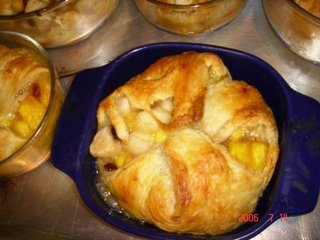
So I grabbed some frozen puff pastry dough out of the freezer and started defrosting it in the microwave. While that was working, I peeled, cored and diced three Bartlett pears. Then, since I had three peaches that were right on the edge, I did the same to them. I tossed the fruit with 1/4 cup sugar and 1/4 flour and a dash of cinnamon. Next, I threw in some dried cranberries just because they were on the counter. The defrosted dough was ready for rolling. I tried to roll it and then form something resembling a hand pie, but the filling was too copious and runny and the dough was too slippery. Plan B: bake the pies in a bunch of round Pyrex dishes and a random square mini-casserole, then fit said containers with lids for safe transport to the grounds.
Phew. That's what I did. And look how it turned out! Pretty good for an off the cuff attempt, if I do say so myself. I do choose to say so, just because I'm usually pretty unadventurous when it comes to following recipes. I just follow. This time, my Lazy Pear Pie and I took the road less taken, and it was a tasty one (but not as much the next day, this is a pie better baked and eaten on the same day)!
19 June 2006
Cherry Tree
Our cherries are ripe! So we'll be eating A LOT of these for the next few weeks...
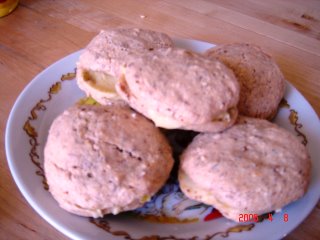
Sour Cherry Muffins
1 1/2 pitted sour cherries, drained
2 1/2 cups flour
1/3 cup sugar
1/3 cup brown sugar
1 tbsp. baking powder
1 tsp. salt
1 cup milk
1/2 cup oil
1 egg
In a large bowl, whisk flour, sugars, baking powder and salt together. Gently fold in cherries. In another bowl whisk the milk, oil and egg, then add to cherry mixture until just combined (don't overmix). Spoon batter into greased muffin cups and bake at 375 F for 23~25 minutes.
10 June 2006
Juice
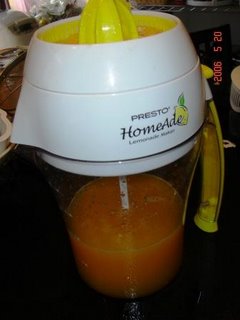
A few weeks ago I had a hankering for limeade. So I bought some limes and squeezed them by hand . The resulting beverage was delicious, but my hand was awfully cramped. You can imagine what a sucker I was the next day when I happened to be in Costco and spotted this lemonade maker. There was no way I wasn't going to buy it, particularly with memories of the previous day's painful limeade experience still fresh in my mind. Since then, I've more than recovered my $16.99 investment. It's been refreshing to have limeade, lemonade, or as pictured here, orange juice anytime. The most unexpected bonus: when friends were over the other day, making lemonade together was great entertainment!
06 June 2006
Thomas' New Face
So I was frantically decorating this Thomas cake for Koji's birthday. I had just drawn Thomas' face on a round piece of cake and stuck it to the front of the body and then walked away for a moment. When I came back, what did I find?! That's right, Thomas did a face plant. I was really upset! I'm not great at drawing and that Thomas face had been the best I could do! So I decided to change my strategy and put Koji's face on the train instead. Phew~nice save! Here are other views of the cake:
I made a double recipe of All-Occasion Downy Yellow Butter Cake and baked half of it in a 9 x 13 and the rest in two small loaf pans. The base of the train was the 9 x 13 cut in half lengthwise and stuck together with lots of buttercream. Then I carved the two loaf cakes into the rounded top of Thomas' "nose" and the boxy top of his cabin (this explanation would sound better if I knew the technical terms for different parts of Thomas' body). After that, because I had run out of time and energy for coloring my icing, I faked it with food coloring spray. This is a highly recommended product for the mom in a hurry! Or just for anyone who wants to have fun with food! The color was not as intense as if I had colored the icing, but it served my purposes well. Last but not least, I'm sure you've already figured out that Thomas, er, "Koji the Train"'s wheels are Oreos, but they aren't just any old Oreos! They are MINT Double Stuf Oreos with blue "spokes" piped on. Yes, I would do the whole thing again and I probably will next year. What character/theme should we go with
31 May 2006
Fishy Business
As a youngster (saying "youngster" makes me sound like an oldster) in Oregon, though I was living in a Pacific state, I somehow didn't eat much fish other than fish sticks. Now, I'm not sure that fish sticks are in fact fish, in much the same way that I'm not sure balogna is really meat. So I really didn't eat fish at all, except perhaps the stray clam in the delicious clam chowder from Mo's.
Therefore, it wasn't until I was in Japan as a teenager that I was exposed to fish and subsequently learned to like and even love it. But now, living in landlocked (yes, we have The Lake, but I think most fish from Lake Michigan are not edible?) Chicago AND with all the recent brouhaha about mercury levels in fish and the threat they pose to pregnant women in particular, it's hard to know if we should eat fish at all.
Well, today's New York Times has saved the day with the following list. I am shamelessly copying it and pasting it here, as I'm concerned that it will become on off-limits item for all but the paying customer in a week or so. Let's enjoy fish!
Fish Guide
Published: May 31, 2006
These fish can be eaten once a week by adults, according to an assessment of contaminant levels by Environmental Defense. Those marked with an asterisk can be eaten more than once a week.
WILD
*ANCHOVIES
ARCTIC CHAR, color added
*ATLANTIC BUTTERFISH
*BLACK COD (Sable, Butterfish on West Coast)
*BLACK SEA BASS Younger children no more than four times a month
*HADDOCK
*HAKE (white, silver and red)
HAKE (Chilean, Cape and Argentine)
*HALIBUT (Pacific only) Older children 3 times a month, younger children twice
*HERRING
*MACKEREL (Atlantic or Boston only)
MAHI-MAHI Younger children 3 times a month
*PACIFIC COD
*PACIFIC SAND DAB (yellowtail flounder)
*PACIFIC WHITING
*PLAICE
PORGIES
*SALMON (Pacific)
*SARDINES
*SHAD
SMELT
*SOLE (gray, petrale, rex, yellowfin)
SOLE (Dover; English or lemon, older children 3 times a month, younger children twice)
WHITEFISH
FARMED
CARP
CATFISH (domestic)
STRIPED BASS (rockfish)
*TILAPIA
*TROUT (rainbow); TROUT (steelhead)
SHELLFISH
*CLAMS (northern quahogs)
CLAMS (Atlantic surf, butter, Manila, ocean quahog, Pacific geoduck, Pacific littleneck and soft-shell)
*CRAB (Dungeness, snow) Dungeness: younger children once a week
CRAB (Florida stone, Jonah, king)
*CRAYFISH (United States)
*LOBSTER (American) Children 2 to 4 times a month
*MUSSELS (farmed blue; wild blue, children 2 to 3 times a month)
MUSSELS (New Zealand green, Mediterranean)
OYSTERS (farmed Eastern and Pacific)
*SCALLOPS (bay; Northeast, Canadian sea)
*SHRIMP (wild American pink, white, brown)
SHRIMP (spot prawns and northern shrimp)
*SQUID
*SPINY LOBSTER (Caribbean, United States, and Australia)
03 May 2006
Raclette
When I went to a friends' house today to make a chocolate cake, I had never heard of
raclette. But if you look closely, you can see it on the upper right quadrant of my plate. The cake was fabulous, but trying out a new kitchen appliance was even more intriguing!
27 April 2006
The Idea of the Macaroons
This is a poor shot of the french macaroons that I spoke of as my first entry on this blog a few weeks ago. Alas, I may not be making them again in the near future. Two complications keep me from continued pursuit of macaroons; first, my lack of stand mixer. And, the impending birth of my second child...
I'll keep you posted on both on my other blog. You let me know if you make macaroons!
25 April 2006
Get Out Your Juicer
Lemon Bars from Cheryl Lynn
1 1/2 cups flour
2/3 cups powdered sugar
3/4 cup softened butter
3 eggs
1 1/2 cups white sugar
3 tablespoons flour
1/4 cup lemon juice (fresh is best, but bottled is OK)
1/3 cup powdered sugar
Preheat oven to 375 degrees. Mix flour, 2/3 c. powdered sugar and butter. Pat down into an 8 x 8 square cake pan. Bake for 20 minutes.
Mix eggs, white sugar, 3 tablespoons flour and lemon juice. Pour over the hot crust. Bake for 20-25 more minutes.
Let cool, sprinkle powdered sugar on top.
20 April 2006
Koji is Three!
All-Occasion Downy Yellow Butter Cake from The Cake Bible
Ingredients (all at room temperature):
6 large egg yolks
1 cup milk
2 1/4 teaspoons vanilla
3 cups cake flour
1 1/2 cups sugar
1 tablespoon + 1 teaspoon baking powder
3/4 teaspoon salt
12 tablespoons softened unsalted butter
350 degree oven
In a medium bowl lightly combine the yolks, 1/4 cup milk and vanilla.
In a large mixing bowl combine the dry ingredients and mix on low speed to blend. Add the butter and the remaining 3/4 cup milk. Mix on low speed until the dry ingredients are moistened. Increase to medium speed (high speed if using a hand mixer) and beat for 1 1/2 minutes. Scrape down the sides of the bowl. Gradually add the egg mixture in three batches, beating for 20 seconds after each addition to incorporate the ingredients.
Scrape the batter into two 9 inch round cake pans (or make cupcakes!) and smooth the surface with a spatula. The pans will be about 1/2 full. Bake 25-35 minutes or until a tester inserted near the center comes out clean. Let the cakes cook in the pans on racks for 10 minutes. Then loosen the sides with knife or metal spatula, remove from cake pan and let cool completely on a greased wire rack.
17 April 2006
Getting Rid of Celery
So as I mentioned yesterday, I'm on a celery kick right now. Enough is enough, though, so I had to do away with my current supply, and the following is the recipe that came to my rescue (also from Everyday Food). Phew! And bonus, Koji even ate it. He wouldn't even LOOK at celery if I tried to serve it to him raw.
Creamy Celery Soup
(serves 2 adults and one 3-year-old boy with a little for lunch the next day)
Heat 2 T butter in a saucepan over medium heat. Add 6-8 large stalks of sliced celery, 1 medium chopped onion, and one small potato, peeled and cut in cubes. Cook for 8-10 minutes or until veges begin to soften.
Add 3 cups of water to saucepan and bring to a boil. Reduce heat and simmer until veges are very tender, 15-20 minutes.
Puree soup with an immersion blender, or pour into a blender and blend (take the cap off the lid and cover with a towel so heat can escape). Return soup to pan and stir in 1-2 T of lemon juice and salt to taste. If you're the garnishing type, throw some celery leaves on.
16 April 2006
Celery Season, I Guess
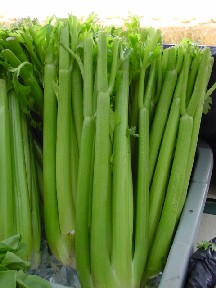
According to last month's issue of Everyday Food, celery is in season right now. But doesn't celery seem to be one of those things that is never out of season? I know in some sense we could say that about all kinds of vegetables and even fruits, as they can be shipped hither and yon about the country or even the planet and one never knows what is really "in season" (unless one is a gardener, which this one is not!). However, I've been enjoying going along with this claim, because in season or not, celery is cheap and easy to get. And I like it.
This is the one of the first recipes I tried, and Aogu really liked it which means it was a true success (he'll eat just about anything, but if he likes something enough to say so, that's kind of a jackpot moment for me).
Chicken & Celery Stir-Fry
Cut one pound of chicken breast into thin strips. In a medium bowl, whisk together: 1 egg white
1 T (tablespoon) cornstarch
1 tsp. salt, 1/4 tsp. pepper
Add the chicken and toss to coat.
Heat 1 T veg(etable) oil in a large nonstick skillet over medium-high heat. Cook as much chicken as you can fit in the pan in a single layer until golden, turning after 2-3 minutes and cooking the second side for another 2-3 minutes. Repeat if necessary (but if you can do it all at once, better!). Remove chicken to a plate.
Add 8-10 stalks of celery, thinly sliced, a 3-inch piece of ginger peeled and slivered lengthwise, and a jalapeno slivered lengthwise (leave out the ribs & seeds or the entire jalapeno if you're a wimp) to the skillet, adding additional veg oil if it's too dry. Cook with a tossing motion, for 4-5 minutes.
Stir 3 T rice vinegar, 1 T sesame oil, and 1 T sugar in with vegetables. Add the chicken and 4 green onions, cut into 3 inch lengths. Toss to heat it all up, 1-2 minutes, and serve with rice.
12 April 2006
Our Kind of Chicken Soup
Last year while we were in Tokyo, I was trying to be more Japanese in my cooking; seemed like the right thing to do according to that old adage. You know, the one about Rome. Not to mention that it was cheaper to go with Japanese ingredients. In my recipe search, I borrowed some magazines from my sister-in-law and copied pages with potential. Ironically, while I was there I never much got around to using them. But now that we're here and craving Japanese food more, I find myself turning to these pages in my three-ring binder, looking for inspiration.
Today I had some ground chicken and no idea what to do with it. These pages are conveniently divided into recipes by main ingredient, so I turned to the page labeled "ground chicken" and found the following soup recipe. It's easy AND delicious!
"Pot of Chicken Meatballs"
Tear about six cabbage leaves into bite size pieces and chop one leek. In a bowl, mix 300 grams (approx. 1/2 pound) of ground chicken, an egg, a teaspoon of ginger paste (or make your own by peeling and grating a fresh piece of ginger; if you do this, squeeze what you grated and add a teaspoon of the juice to the chicken and egg) and a pinch of salt until thoroughly combined.
In a medium pot or saucepan, combine 1200 ml (4 1/2 cups) water with 1 tsp. of chicken boullion, 2 tablespoons each of cooking sake and soy sauce, and another pinch of salt and bring to a boil over medium heat. Add the cabbage and leek and simmer until soft (about 4-5 minutes). Spoon the chicken mixture into the broth a scoop at a time, making meatballs to your preferred size. Simmer until meatballs are cooked (3-5 more minutes).
Great with rice (Japanese style, please!) either on the side or added to the soup. Noodles would probably be good too, but I haven't tried that yet...
11 April 2006
Underripe & Overripe = Just Ripe
Mangoes were on sale two for $1 the other day, so I grabbed four. They looked ready to go, but when I cut into one last night I realized that one, at least, wasn't. I quickly substituted some honeydew melon for it and Koji was perfectly happy. But I, however, wasn't.
Reluctant to toss my 50 cent investment, my knife and I wrestled the underripe mango into bite-size chunks and stuck it in the fridge. Next discovery: the five Bosc pears I picked up the other day, thinking to experiment with poaching, were on the edge.
So tonight it came to me: why not put the tough mango and the not-so-tough pears together under a blanket of oats and brown sugar? Better yet, sprinkle in some coconut so that tropical mango wouldn't be so lonely...
Mango & Pear & Coconut Crisp
adapted from that red & white checked cookbook
Toss 2 mangoes, ripe or not so, cut into small chunks and 5-6 Bosc pears, also peeled and cut into small chunks with two tablespoons of sugar in an eight or nine inch cake or pie pan.
In a separate bowl, mix:
1/2 cup rolled oats
1/2 cup brown sugar
1/4 cup flour
large pinch of cinnamon or nutmeg
Into the above, smash 1/4 cup of softened butter with a fork or pastry cutter until the butter is spread throughout in little chunks the size of peas. Stir in 1/4 cup of sweetened flaked coconut (or substitute chopped walnuts or pecans if you like those better...but remember you'll be giving up that tropical edge). Dump and spread the lot onto the waiting mangoes and pears, then bake at 375 for 30-35 minutes. Serve with whipped cream or ice cream or a hula skirt or all three?
10 April 2006
As Promised, Cheese Bread
Giving credit where it's due, as I mentioned before, this is a Cook's Illustrated recipe. Of their recipes I've tried, none have been total bombs, but this one is a particular favorite. Try it, you'll like it, too!
Makes one 9 by 5-inch loaf
3 ounces Parmesan cheese , shredded on large holes of box grater (about 1 cup)
3 cups unbleached all-purpose flour (15 ounces)
1 tablespoon baking powder
1/4 teaspoon cayenne pepper (I used "hot," it gave a good kick)
1 teaspoon table salt
1/8 teaspoon ground black pepper
4 ounces extra-sharp cheddar cheese , cut into ½-inch cubes, or mild Asiago, crumbled into ¼- to ½-inch pieces (about 1 cup) (I used medium cheddar)
1 1/4 cups whole milk
3 tablespoons unsalted butter , melted
1 large egg beaten lightly
3/4 cup sour cream
1. Adjust oven rack to middle position; heat oven to 350 degrees. Spray 5 by 9-inch loaf pan with nonstick cooking spray, then sprinkle 1/2 cup Parmesan evenly in bottom of pan.
2. In large bowl, whisk flour, baking powder, cayenne, salt, and pepper to combine. Using rubber spatula, mix in cheddar or Asiago, breaking up clumps, until cheese is coated with flour. In medium bowl, whisk together milk, melted butter, egg, and sour cream. Using rubber spatula, gently fold wet ingredients into dry ingredients until just combined (batter will be heavy and thick). Do not overmix. Scrape batter into prepared loaf pan; spread to sides of pan and level surface with rubber spatula. Sprinkle remaining 1/2 cup Parmesan evenly over surface.
3. Bake until deep golden brown and toothpick or skewer inserted in center of loaf comes out clean, 45 to 50 minutes. Cool in pan on wire rack 5 minutes; invert loaf from pan and continue to cool until warm, about 45 minutes. Cut into slices and serve.
BONUS:
Freezing Instructions: Although the recipe title Quick Cheese Bread is no misnomer(the batter is in the pan in 15 minutes), when you add time for baking and cooling, the recipe does require a total of two hours. Luckily, like many of our other bread recipes, a baked loaf of cheese bread freezes beautifully, meaning a warm loaf need be only minutes away. To freeze the bread, wrap the cooled loaf tightly with a double layer of aluminum foil and place in the freezer; it will keep for up to three months. When you’re ready to serve the bread, place the frozen, wrapped loaf on the middle rack of a preheated 375-degree oven and heat for eight to 10 minutes, until the loaf yields under gentle pressure. Remove the foil and return the unwrapped bread to the oven for five minutes to crisp the exterior. Take the bread out of the oven and let cool on a rack for 15 minutes to make slicing easier. Enjoy.
07 April 2006
Worth the Trouble
French Almond Macaroons
from Martha Stewart
Heat oven to 300. Sift 1 1/4 cups confectioners’ sugar and 1 1/2 cups (4 oz.) finely ground almonds together. Line two baking sheets with parchment or non-stick baking mats.
Put three room temperature egg whites in the bowl of a stand mixer and beat on medium until foamy. Throw in a pinch of salt and then add 1/4 cup sugar one or two teaspoons at a time. When soft peaks form, stop the mixer and fold in the almond mixture and 1/4 tsp. vanilla with spatula.
Drop mixture onto prepared baking sheets with a spoon (Martha recommends piping 1 1/2 circles with a pastry bag...that would probably work better but it's a little fussy so I haven't tried it yet. The spoon method has been fine for me.), then bake 25-30 minutes, rotating the sheets halfway through the baking time. Let the macaroons cool on the sheets for a few minutes, then transfer to a rack to cool completely.
Make your favorite frosting (Martha recommends this buttercream, which is tasty, but VERY buttery and maybe a little too much?) and sandwich cookies together with it. Cookies taste better post-sandwiching and after a few hours of "ripening" in the fridge.
Variations:
Strawberry Macaroons--Follow instructions for French almond macaroons, adding 4 drops red food coloring to the egg whites just before you add the sugar-almond mixture. Proceed with the recipe. For the filling, use only 1 teaspoon vanilla, and fold 1/3 cup strained strawberry preserves into the Swiss meringue buttercream after you mix in the butter (or maybe next time I would try sandwiching with straight up jam?).
Chocolate Macaroons--Follow instructions for French almond macaroons, sifting 2 tablespoons Dutch-process cocoa powder with the confectioners’ sugar. Proceed with recipe. Instead of the Swiss meringue buttercream, make a ganache filling: Place 5 ounces finely chopped semisweet chocolate in a small bowl. Bring 1/2 cup heavy cream just to a simmer in a small saucepan, and pour over the chocolate. Let stand 1 minute, and stir until chocolate has melted. Let ganache stand until thick enough to spread. Use to fill cookies.
Subscribe to:
Posts (Atom)